Skip to product information
1 of 2

NyNy Lash

Stella - Light Brown Individual Lashes

Stella - Light Brown Individual Lashes

Regular price $16.99 USD
Regular price Sale price $16.99 USD
Sale Sold out
Shipping calculated at checkout.
Quantity

Stella Light Brown Lashes Only - Ma Cherry Collection

Our Stella Light Brown Lashes are perfect for those looking for something different than black and is a perfect set for those with naturally lighter lashes. 

- Lightweight Design: Ideal for all-day comfort and wear without feeling heavy.
- Seamless Band:Band is an ultra-thin, light brown band allowing for easy application and seamless blending with your natural lashes.
- Natural-Looking: Delivers a beautiful, subtle enhancement, achieving a "your lashes but better" effect.
- Versatile Style: Perfect for creating both elegant, everyday looks and bold, dramatic styles.
- Part of the Ma Cherry Collection: A stunning addition that elevates your beauty regimen with unparalleled quality and style.

*Does NOT include Bond/Seal, Tweezers, or Remover.

View full details

Lash FAQs

How To Apply & Remove Individual Lashes

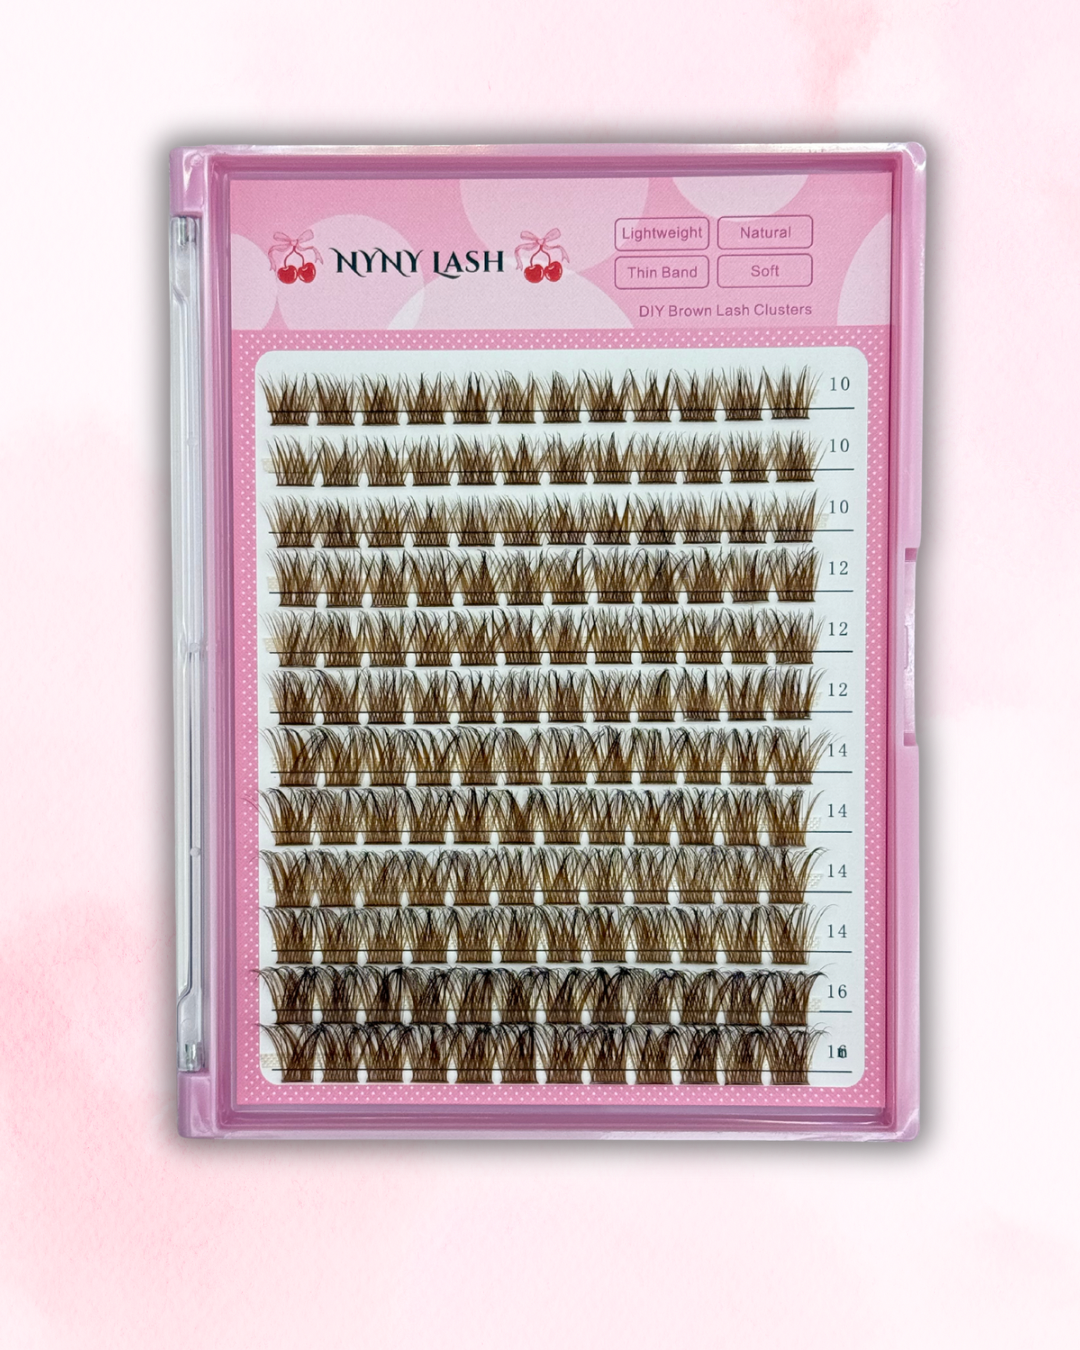
How To Apply Individual Lashes?

We recommend washing your face and eye area before applying to get rid of any excess oil on your natural lashes.

Avoid using of lotions, creams, sunscreen, and heavily oil-based cleansers and products directly to the eye area before application as this can weaken the adhesive and make it harder for them to stick. These can be applied after but avoid the eye area.

Make sure your tweezers are clean before applying any of our lashes to help them not stick to your tweezers.

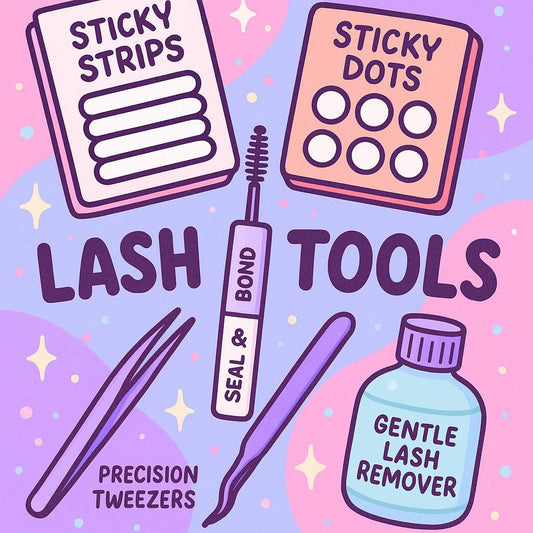
Bond and Seal Method

Step 1. Apply our Bond glue to the base of your natural lashes. Wait 30-60 seconds until it gets tacky. Pick up the lash clusters with your tweezers at the base of the cluster.

Step 2. Gently apply the cluster to the base of your natural lashes.

Step3. After all the lashes are applied, apply our Seal to the base of the lashes.

Tip: Apply the seal to a pair of tweezers and clamp together your natural lashes with the clusters you applied. Now enjoy your new look!

Lash Glue Method

Step 1: Pick up the lash with tweezers and apply our Kitty Milk Lash Glue to the base of the lash.

Step 2: Wait 20-30 seconds for the glue to get tacky.

Step 3: Place the lash to the base of your natural lashes and adjust until they fit the way you desire.

Step 4: Clamp together with tweezers or an eyelash curler and Tada! Your lashes are done.

Sticky Dot Method

Step 1: Only expose one column of Sticky Dots at a time. Hold the clusters with tweezers and press the band onto the Sticky Dot. Do not attempt to pick up the Sticky Dot.

Step 2: Press the lash onto the sticky dot enough for them to stick together.

Step 3: Gently pull up and apply the cluster to the base of your lashes.

Step 4: Press the lashes together to your natural lashes with the tweezers or push with your finger. Tada! Enjoy your new look!

How to remove?

Use an oil cleanser or our Lash Remover.

Using our Lash Remover wand, gently apply the solution on the lashes. Roll the wand over the lashes to loosen the glue.

This may have to be done a few times until the glue loosens enough to break free on its own.

Once the lashes are loosened off, you can easily wipe the lashes off. If there is still excess glue on your natural lashes, continue using the Remover solution over your lashes, wipe, and repeat until the glue is completely gone.

If you used our Sticky Dot method just gently pull the lashes off with your fingers and place them back into their box for next use.

How To Use Pre-Glued (Press On) Lashes

How do I apply pre-glued lashes?

We recommend washing your face and around the eye area before applying the clusters to get rid of any excess oil on your natural lashes.

Avoid using of lotions, creams, sunscreen, and heavily oil-based products directly to the eye area before application as this can weaken the adhesive and make it harder for them to stick. These can be applied after but avoid the eye area.

Make sure your tweezers are clean before applying any of our lashes to help them not stick to your tweezers.

Step 1. Gently, pick up the pre - glued lashes from the middle of the lash (not the end where the adhesive is, and not directly on the tips, aim for the middle) Place the lashes to the base of your natural lash.

Step 2. We recommend pressing the clusters together with your natural lash to ensure they stick or taking your finger and gently pushing on the base of the lashes onto your natural lashes to further press them in. You can also take an eyelash curler and use it to press the clusters on more securely. Now enjoy your new look!

These can also still be worn as regular lashes with our bond and seal or kitty milk lash glue as well and removed with our remover.

How long do pre glued lashes last?

Pre-glued lashes can last for multiple wears (usually 2-3 separate wears).

Can I still use pre-glued lashes after the glue is no longer sticky?

Yes! These lashes are reusable. Even once the adhesive on the lashes is not sticky anymore, they can then be applied like regular lash clusters with our Bond and Seal, or you can turn them into pre -glued lashes again with our "Sticky Dots".

Are these lashes waterproof?

Yes, these lashes can withstand water; however, we do not recommend drenching them in water for long periods of time to ensure they do not lose their stickiness. If you would like them to be more waterproof, you can apply them with our Bond and Seal instead.

How do I remove pre-glued lashes?

Removing is as easy as just giving the lashes a little tug with your tweezers or fingers. Once they are off, pop them back in their case for another use. If they are applied with our bond and seal or lash glue, remove with our lash remover or an oil cleanser instead.

How To Use "Sticky Dots" & "Sticky Strips"

How To Apply “Sticky Dots”:

Step 1: Only expose one column of Sticky Dots at a time. Hold the clusters with tweezers and press the band onto the Sticky Dot. Do not attempt to pick up the Sticky Dot.

Step 2: Press the lash onto the sticky dot enough for them to stick together.

Step 3: Gently pull up and apply the cluster to the base of your lashes.

Step 4: Press the lashes together to your natural lashes with the tweezers or push with your finger. Tada! Enjoy your new look!

How To Apply "Sticky Strips":

Step 1: Hold the lash strips with your fingers and press it against the Sticky Strip.

Step 2: Use the tool on the back to press the lash strips better onto the Sticky Strips.

Step 3: Gently use the corner of the tool to push off the Sticky Strip and Lash Strips from the holder.

Step 4: The lashes should now be easily attached to the Sticky Strip. If there is extra Sticky Strip, use a clean pair of scissors to cut off the excess. Enjoy your new look!

How To Care For Lashes

1. Once your lashes are off, they’ll need a quick cleanse. Using a lash cleanser specifically designed for lash extensions or cluster lashes is important.

Regular cleansers or soaps can be too harsh, breaking down the delicate fibers of your lashes. A proper lash cleanser will lift off any leftover glue, dirt, or makeup, leaving your clusters fresh and ready to go.

2. If your lashes have a bit more build-up, give them a quick soak. A small bowl of lukewarm water with a few drops of lash cleanser is all you need.

Soak your lashes for 2-3 minutes to loosen any stubborn adhesive or grime. This step helps clean thoroughly without damaging the lash fibers. Just be careful not to soak them for too long as this could affect their shape and quality.

3. Use tweezers to gently peel away any remaining adhesive without pulling or tearing the lashes.

Make sure you’re delicate here; the goal is to keep the lash band intact and smooth for reuse.

4. Let them air dry. Lay them flat on a clean towel or paper towel. Heat tools like blow dryers can cause the lash fibers to become brittle, so it’s best to avoid them.

5. Reshape them if they’ve lost a little of their curl while cleaning with a spoolie.

If you want your cluster lashes to last longer, regular maintenance is important. Clean them after each wear to prevent makeup and oil build-up.

Returns/Exchanges

We have a 30- Day Return Policy for items that meet our return and exchange requirements. Items must be unused, unopened, and free from any damages. Please view our Refund Policy for more information regarding returns/exchanges.

Get $$ OFF

Learn more about our Limited Time Deals

More FAQs

For more FAQs please view our FAQs page.

Customer Reviews

Be the first to write a review
0%
(0)
0%
(0)
0%
(0)
0%
(0)
0%
(0)